
Importing requirements to Azure DevOps
When starting up a custom development project using an Application Lifecycle Management tool such as Azure DevOps, importing requirements is the first step. Word, PDF and Excel documents are usual sources for the requirements. This article describes a scenario with requirements and a method how to import them to Azure DevOps.
Decisions before starting import
- What process to use for the project, Scrum and Agile are most common
- How to map the requirement documentation to the work item levels
Scrum is used in this example. The scrum process has the work item types Epic, Feature, PBI (Product Backlog Item) and Task in hierarchical order, Epic in top. A simple way is to see Epics and Features as placeholders for describing requirements from a business perspective, i.e. the documentation you usually get from the customer. PBI:s and Tasks are created for detailed descriptions of what specific functions to develop to fulfil the requirements.
There is no absolute model or truth in how to distribute the information between the levels, but you need to find a good way for your specific project before importing the requirements. Setting up a minimal PoC as an example with all levels populated with work items is a good way to test and also discuss with the customer how it will work.
Scenario
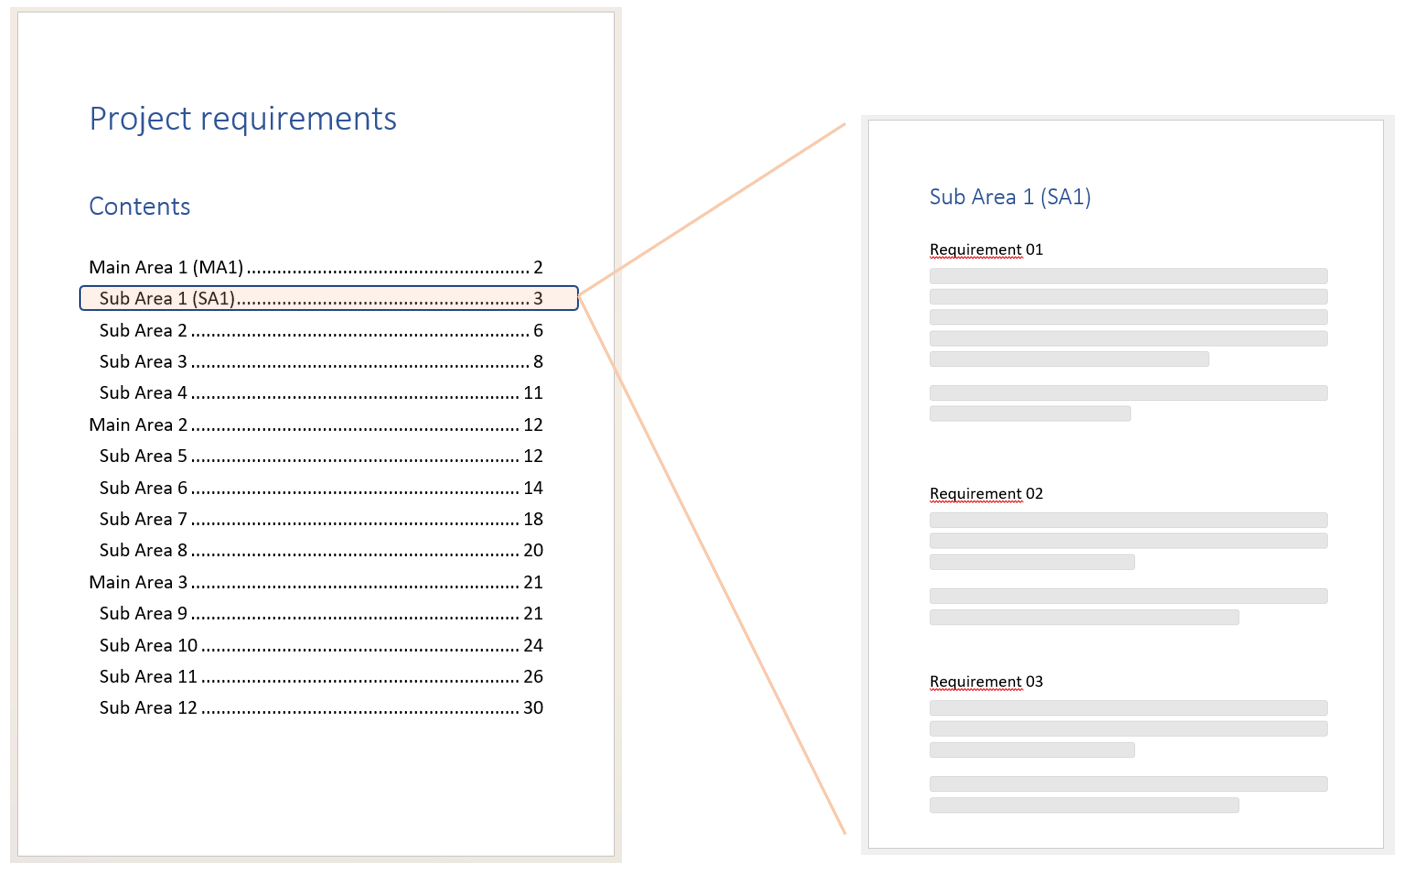
- 100 numbered requirements with a few rows of text per req.
- In documentation, requirements are organized in
- 3 main areas (MA)
- 4 sub-areas (SA) per MA, i.e 12 SA in total
- about 6-10 requirements (Rnn) per SA, summing up to 100 req
- 4 sub-areas (SA) per MA, i.e 12 SA in total
- 3 main areas (MA)
Selected solution for mapping requirements
- Map each requirement to a Feature, i.e. 100 Features. During the project, it is easy to find the requirement, see how many PBI:s it resulted in to fulfil the req, and what the state is for the PBI:s.
- Select Epic mapping, either 3 main areas or 12 sub areas. Here we select the 12 sub areas and tag each of them with the top Main Area level.
Preparing import
Importing work items in a hierarchial structure is a bit of a hassle and there are different approaches. It is possible to have both Epics and Features in the same file, but DevOps does not have the logic for creating all Epics before Features when importing, as a result the parent/child relation between Epics/Features will fail.
We use two different files for Epics and Features and include tags to help connect the structure after importing.
- Create two Excel files with columns Work Item Type, Title, Description, Area Path, Iteration Path and Tags.
- Epics in first file, Title and Description directly from requirements (sub area), Tags containing the name of main area.
- Features in second file, Title and Description directly from requirements, Tags containing the name of sub area.
If you created a POC, export Epics and Features via a query to see a csv file example.
The challenge is to map reqirement texts to the columns in the csv file. There is room for a lot of creativity, but here is one method.
- If the text is in a Word or PDF file, copy content to an Excel file and filter out the Titles/Descriptions and main/sub areas in corresponding columns. Add the static columns Work Item Type, Area Path and Iteration Path, they are mandatory when importing.
- Surround Title, Description and Tags fields with quotation marks (") - it will solve issues if the fields contains commas.
- Save as an xls file - it will be your original file if you need to make changes.
- Save the file as csv utf-8. If you get a semicolon separated file when saving from Excel, use Notepad to replace semicolons with commas.
If the transformation is complicated, the Power Query Editor in Excel is a really good tool to step-by-step transform a input file from source to DevOps import format. You still have to do the semicolon/comma replace with notepad, and maybe replacements to quotes (") also.
When all is ready, you will have something similar to these two examples.
Epics csv file:

Features csv file:

Importing
Now it is time to import all to DevOps. The import function is found under Boards, Queries, format is CSV. Note: semicolon separated files are not supported, the separator must be a comma (,)
Use "Import Work Items" in the Queries menu, select a file for import (Epics as example here) and hit Import. All rows are viewed, on the right hand side you have a preview of the work item. Nothing is saved yet. Use "Save" button in preview to the right to save the selected Epic, or use "Save items" in top left to save all Epics. It is really useful to have a preview before importing all, you can always cancel the import and adjust the file if needed.

If there are rows in red colour, they have some sort of issue to be resolved. If just a few issues, fix it manually for each work item, or select multiple rows and use the Edit function in the three-dot menu. Do not save all items if you have failed rows - it is complicated to keep track of what's imported or not if you have to reload import from the file.
Post-import steps
When all Epics and Features are imported, they need to be connected in a parent/child relation.
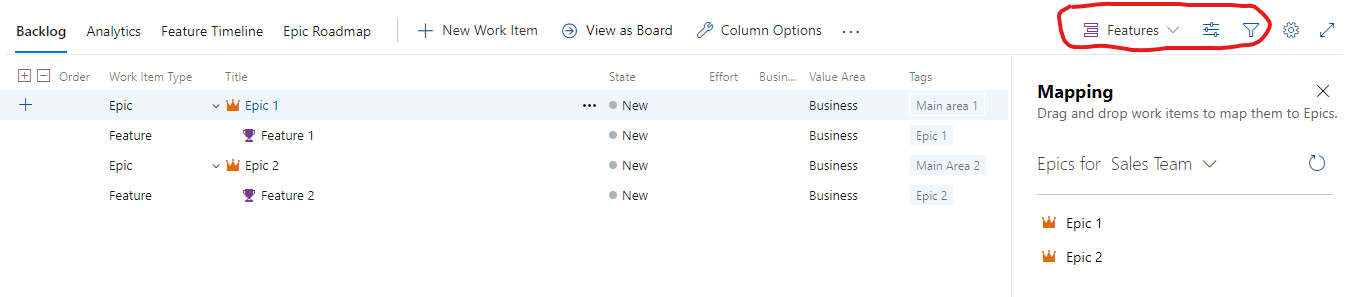
- Go to the Boards/Backlog view and select Features to view all imported features.
- Select "View options" icon in top right and then Mapping. The Epics will show up to the right.
- Include Tags with Column options and use filter Tags to select features with a specific Epic.
- Select the filtered features and drag-and-drop them to the Epic, use normal Ctrl and Shift functions when selecting, Ctrl-A works. Repeat for all Epics.
The result will look like this. All set for creating PBIs/Tasks and develop functions.
Summary
Mapping requirements from different sources to DevOps import files requires some work, but having all requirements in DevOps is a great benefit in a development project. It is time well spent to plan a well-working structure and import all requirements as a one-off when starting a larger project.

Krister Ranta
Krister Ranta is a successful IT project manager who takes an agile and collaborative approach to deliver complex projects on time and within budget. He is passionate about using technology to drive business value and enjoys sailing, skiing and badminton in his free time.